Hydrangeas are beloved for their lush blooms and vibrant colors, and propagating them through cuttings is a fantastic way to grow more plants for free.
While many gardeners wait until spring or summer to take cuttings, fall is actually the ideal time for this process.
Cooler temperatures and the plant’s semi-dormant state make it easier for cuttings to develop strong roots over the winter months.
In this guide, we’ll walk you through why fall is the best time to take hydrangea cuttings and provide a step-by-step process to do it right.
Why Take Hydrangea Cuttings in Fall?
Fall is the perfect season for taking hydrangea cuttings for several reasons:
- Less Stress on the Plant: As hydrangeas enter dormancy, they are less active, reducing the stress on both the parent plant and the cuttings.
- Ideal Root Development: Cooler temperatures encourage root growth while reducing the risk of fungal infections.
- More Time to Establish: Cuttings taken in the fall have the entire winter and spring to develop strong roots before the next growing season.
What You’ll Need
- Sharp, sterilized pruning shears or scissors
- Rooting hormone (optional but recommended)
- Small pots or containers with drainage holes
- Well-draining potting mix (or a mix of perlite and peat moss)
- Clear plastic bag or humidity dome
- Watering can or spray bottle
How to Take Hydrangea Cuttings in Fall: Step-by-Step Guide
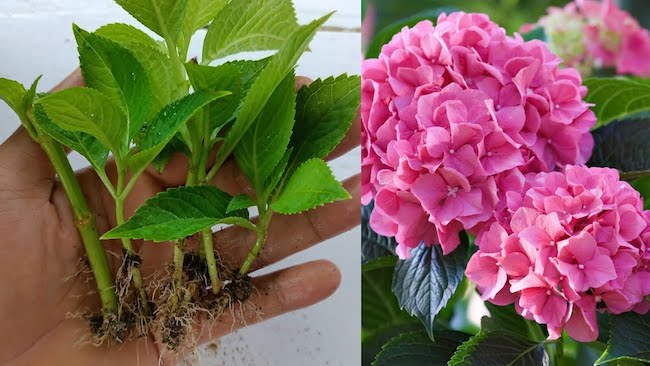
Step 1: Choose Healthy Stems
- Select a non-flowering stem that is green and flexible, with at least 2-3 leaf nodes (the places where leaves grow).
- Avoid brown or woody stems, as they are less likely to root successfully.
Step 2: Take the Cuttings
- Using sharp, sterilized shears, cut a 4-6 inch section just below a node.
- Remove the lower leaves, leaving only a couple of leaves at the top. If the leaves are large, trim them in half to reduce moisture loss.
Step 3: Prepare the Cuttings
- Dip the cut end of the stem in rooting hormone to encourage faster root development. This step is optional but highly recommended for better results.
Step 4: Plant the Cuttings
- Fill small pots with well-draining potting mix or a blend of perlite and peat moss.
- Make a small hole in the soil with a pencil or your finger, and gently insert the cutting, ensuring at least one node is buried under the soil.
Step 5: Water and Cover
- Lightly water the soil to settle it around the cutting.
- Cover the pot with a clear plastic bag or place it under a humidity dome to maintain high humidity levels, which are crucial for rooting.
Step 6: Place in a Bright, Indirect Light Location
- Place the pots in a warm spot with indirect sunlight—a windowsill or a bright room is perfect. Avoid direct sunlight, which can cause the cuttings to dry out.
Step 7: Monitor and Maintain Moisture
- Check the cuttings every few days to ensure the soil stays moist but not waterlogged. Mist the cuttings if the humidity drops inside the plastic cover.
How Long Does It Take for Hydrangea Cuttings to Root?
Hydrangea cuttings typically begin to develop roots within 2-4 weeks, but full root development may take up to 6-8 weeks. You’ll know the cutting has rooted successfully when you see new growth at the top.
When to Transplant Hydrangea Cuttings
Once the cuttings develop strong roots, you can transplant them into larger pots or directly into the garden. If you start cuttings in fall, keep them indoors until spring, when the threat of frost has passed. In early spring, they’ll be ready to thrive outdoors.
Tips for Success
- Use Rooting Hormone: It increases the chances of successful propagation.
- Avoid Overwatering: Keep the soil moist but not soggy to prevent root rot.
- Provide Humidity: A plastic cover helps retain moisture, which is essential for rooting.
- Label Your Cuttings: If you’re propagating multiple varieties, labeling helps you keep track.
Propagating hydrangeas in fall is an easy and cost-effective way to expand your garden with beautiful blooms.